To snap windows in Mac, drag a window to the left or right screen edge, or hold Option while dragging it toward an edge or corner. You can also hover over the green button and pick a Move & Resize layout, or press Fn-Control plus an arrow key. These methods work on macOS Sequoia 15 and later.
Anyone who has switched from Windows expects snapping to be a quick drag, and on a Mac it can be. But Apple spreads window snapping across edge dragging, the green button menu, keyboard shortcuts, and Split View, and each one behaves differently. Corner snapping, for example, has no default keyboard shortcut. This guide covers every built-in method on macOS Sequoia, Tahoe, and Golden Gate, and shows how an app like Vehla adds one-gesture snapping. By the end, you'll know which way to snap windows on your Mac is fastest for how you work.
Every Way to Snap Windows on Mac at a Glance
This table compares each built-in method and Vehla's SnapWheel by best use, whether you need an app, and the minimum macOS version, so you can jump straight to the one that fits how you work.
|
Method |
Best for |
Needs an app? |
Minimum macOS |
|
Vehla SnapWheel |
One-gesture snapping plus actions |
Yes |
macOS 15, Apple Silicon |
|
Drag to screen edge |
Quick halves and quarters |
No |
Sequoia 15 |
|
Option-drag |
Faster, more precise tiling |
No |
Sequoia 15 |
|
Green button menu |
Mouse users, multi-window layouts |
No |
Sequoia 15 |
|
Fn-Control shortcuts |
Keyboard-first work |
No |
Sequoia 15 |
|
Split View |
Two apps in full screen |
No |
macOS 10.11 El Capitan |
What Is Window Snapping on a Mac?
Window snapping lets you move a window to a set position, such as the left half or a corner, in one action instead of resizing it by hand. Apple calls this tiling so you will see both terms.
Snapping differs from two other Mac features. Split View puts two apps side by side in full-screen mode. Stage Manager groups apps into a stack at the side of the screen, so it organizes windows without tiling them. Before Sequoia, built-in options to snap windows on Mac OS were limited to Split View and, with Option held, the green button's Move Window to Left or Right Side of Screen items. Sequoia added edge-drag tiling, quarter positions, and the shortcuts below.
How to Snap Windows on Mac With Built-in Tools
macOS Sequoia and later give you four built-in ways to snap windows on Mac without installing anything: dragging, the green button and Window menu, keyboard shortcuts, and Split View. Start with the one that matches how you work, or combine them.
Method 1: Drag a Window to the Screen Edge
Drag a window to the left or right edge to fill that half, or to a corner to fill a quarter. Release when the highlighted area appears. Dragging to the menu bar makes the window fill the desktop.
How to Enable Window Snapping on Mac:
If dragging does nothing, check your settings:
-
Open System Settings.
-
Click Desktop & Dock.
-
Scroll to Windows.
-
Turn on the options you want: "Drag windows to screen edges to tile," "Drag windows to menu bar to fill screen," "Hold ⌥ key while dragging windows to tile," and "Tiled windows have margins." (On macOS Golden Gate 27, the first option reads "Drag windows to left or right edge of screen to tile.")
Hold Option while you drag toward the top, a side or any corner. Apple describes this as faster tiling, because the window snaps as soon as you reach the highlighted area.
One warning: dragging a window all the way through the top edge opens Mission Control. If your version lists "Drag windows to top of screen to enter Mission Control" in Desktop & Dock, turn it off to stop that.
Method 2: Tile Windows With the Green Button or Window Menu
Hover over the green button in the top-left corner of a window, then pick a layout. Hold Option while hovering to reveal more layouts.
Move & Resize vs. Fill & Arrange
-
Move & Resize positions the active window in a half or quarter.
-
Fill & Arrange tiles several windows at once. This is the closest thing macOS has to a built-in layout tool for arranging multiple windows.
-
Full Screen (green button) or Full Screen Tile (Window menu) places windows in full screen or Split View.
The same choices live in the menu bar under Window > Move & Resize. That menu also has Center and Fill, which help when you want to tile windows on a MacBook with a small screen.
Method 3: Mac Window Snapping Keyboard Shortcuts
The main window tiling shortcuts on Mac use Fn-Control plus an arrow key. These come from Apple's tiling documentation:
|
Action |
Shortcut |
|
Fill the desktop (maximize) |
Fn-Control-F |
|
Center the window |
Fn-Control-C |
|
Left half |
Fn-Control-Left Arrow |
|
Right half |
Fn-Control-Right Arrow |
|
Top half |
Fn-Control-Up Arrow |
|
Bottom half |
Fn-Control-Down Arrow |
|
Return to previous size |
Fn-Control-R |
|
Active window left, second window right |
Fn-Control-Shift-Left Arrow |
|
Active window right, second window left |
Fn-Control-Shift-Right Arrow |
|
Top and bottom arrangements |
Fn-Control-Shift-Up/Down Arrow |
|
Half plus two quarters (macOS Golden Gate 27) |
Fn-Control-Option-Shift plus an arrow |
Three practical notes:
-
Fill is not full screen: The mac maximize window shortcut, Fn-Control-F, expands the window to fill the desktop without entering full-screen mode.
-
Corner shortcuts don't exist by default: Apple lists the four quarter positions with no keyboard shortcut. You can try assigning your own under System Settings > Keyboard > Keyboard Shortcuts > App Shortcuts, using the exact menu item name. A launcher with window control, covered below, is the easier route.
-
Half-screen shortcuts on Mac can conflict with other apps or some external keyboards. If nothing happens, jump to the troubleshooting section.
Method 4: How to Split Screen on Mac With Split View
To split the screen on a Mac, hover over the green button, choose Full Screen Tile, then pick Left of Screen or Right of Screen. Select a second window on the other side, and both fill the screen.
Drag the divider between them to give one app more room. To leave Split View, exit full screen from the green button menu.
Split View differs from tiling in one way: both apps go full screen and get their own Space. Tiling keeps windows on your normal desktop, so you can still reach the Dock and other windows. There is no dedicated Mac split-screen shortcut for Split View, so use the green button or the Window menu.
Snap Windows on Mac With Vehla SnapWheel

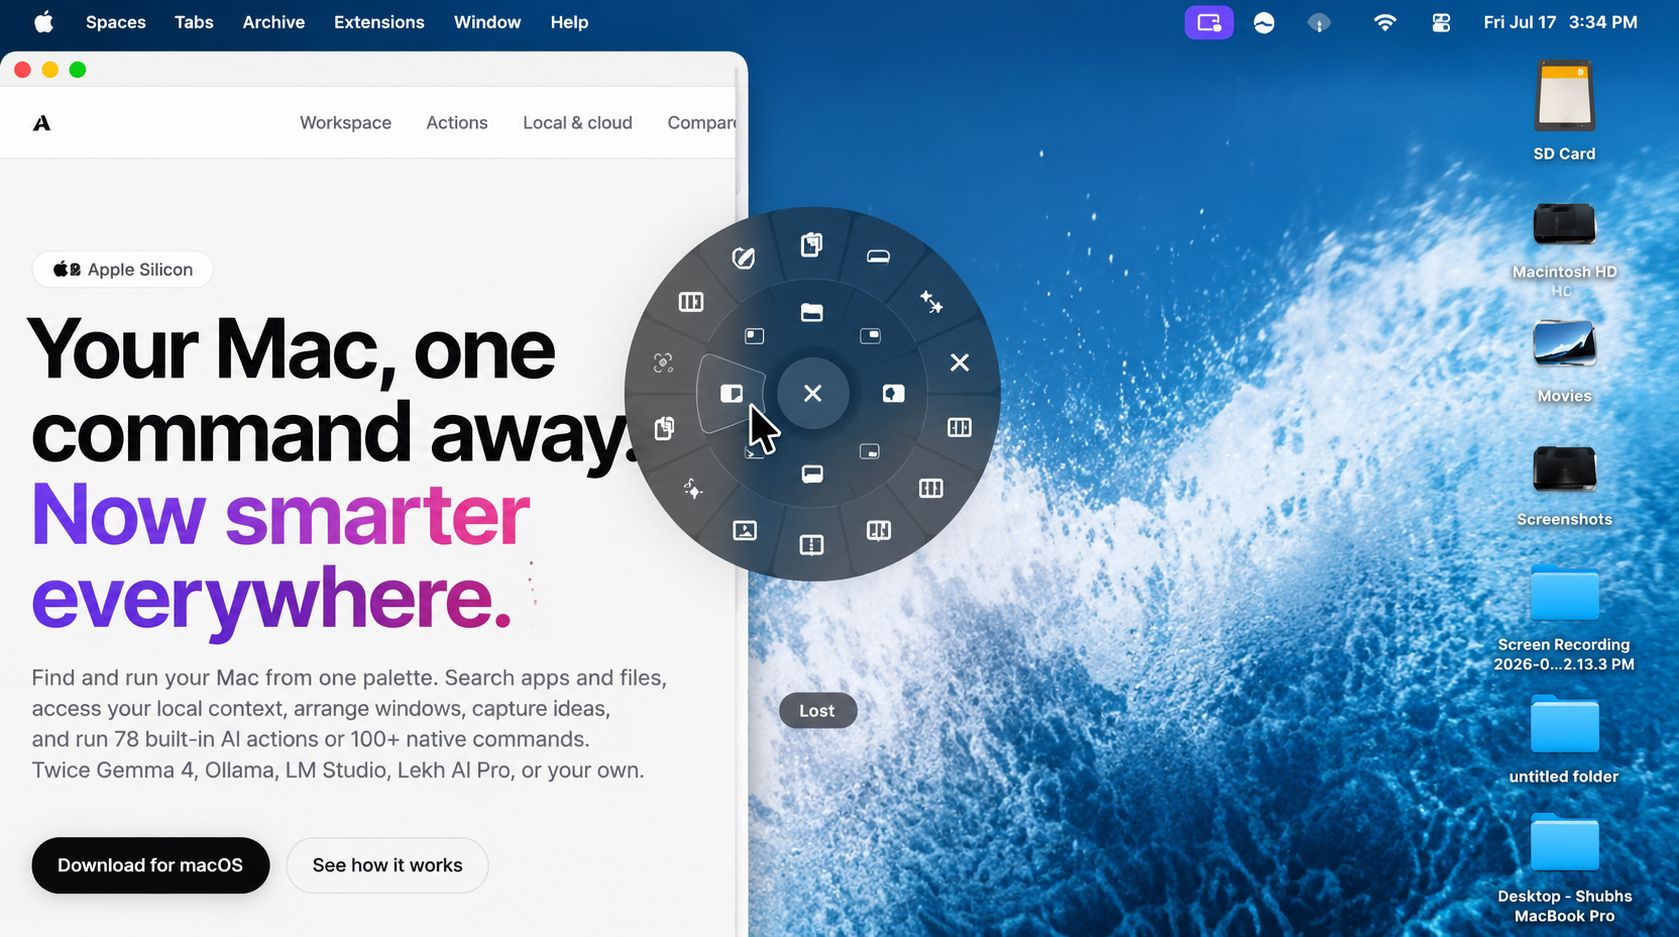
Built-in snapping works, but it asks you to drag to an edge, remember a modifier key, or hover over a button. Vehla is a native macOS command center for Apple Silicon, and it includes a radial window snapping tool called SnapWheel, so you don't have to do any of that.
SnapWheel puts a menu of actions around your pointer. The homepage lists Snap Left, Snap Right, and Fullscreen next to Ask AI, Summarize, Screenshot, Clipboard, and Shelf. Window control and everyday actions sit in one gesture, which makes it a compact mac window manager that replaces separate tools. It is part of the idea behind one app instead of fourteen Mac utilities.
Here is what a typical session looks like:
-
Open your research in a browser and snap it to the left.
-
Snap your draft to the right.
-
Select a paragraph and run Summarize, or Ask AI with the model you choose, without leaving the window.
That flow is the heart of Vehla's approach to Mac window management: you keep working in the same place. For more on that, see three ways to work without leaving your current app and how people fit Vehla into a daily ⌥Space routine.
Plans: Vehla Free includes basic window management. Vehla Pro is a one-time $29.99 for two Macs, with a 7-day trial and no card required. You can compare Vehla Free and Pro plans before you decide. Vehla requires macOS 15 or later on Apple Silicon and does not run on Intel Macs.
Setup steps and options are in the SnapWheel settings documentation.
Which Method to Snap Windows on Mac Should You Use?
The best window manager for Mac depends on how you work:
|
If you... |
Use |
|
Snap windows now and then |
Drag to edge, or Option-drag |
|
Prefer the keyboard |
Fn-Control shortcuts |
|
Want to tile several windows at once |
Green button > Fill & Arrange |
|
Want two full-screen apps |
Split View |
|
Want quarters, actions and window control in one place |
Vehla SnapWheel |
If you run multiple windows across a large display, a launcher-style Mac tiling window manager like Vehla saves the most time. For occasional use, the built-in tools are enough.
Why Isn't Window Snapping Working on My Mac?
Most snapping problems come from one of five causes.
-
Your macOS is too old: Edge tiling and the tiling shortcuts require macOS Sequoia 15 or later. Check System Settings > General > Software Update.
-
The setting is off: Confirm the toggles in System Settings > Desktop & Dock > Windows.
-
A shortcut conflict: Another app or an external keyboard may be using Fn-Control combinations. Try a different app or the built-in keyboard.
-
Mission Control interfere: Dragging through the top edge opens it. Turn off that Desktop & Dock option if your version offers it.
-
The window can't resize: Some apps use fixed-size windows and ignore tiling.
If a Vehla action doesn't respond, confirm you have installed the latest version and that macOS permissions for the app are enabled.
Frequently Asked Questions
Is there a Ctrl key on a Mac?
Yes. The Control key (⌃) sits at the bottom left of the keyboard. Most Windows Ctrl shortcuts use Command (⌘) on a Mac, but the tiling shortcuts above use Fn-Control.
What are some hidden Mac window shortcuts?
Option-drag tiles windows faster, Option on the green button reveals extra layouts, Fn-Control-R restores a window's previous size, and Fn-Control-C centers it.
Is snipping the same as snapping on a Mac?
No. Snapping arranges windows, while snipping means taking a screenshot. Press Shift-Command-5 for screenshot tools. Vehla's SnapWheel also lists a Screenshot action next to its window controls.
Does Vehla work without an internet connection?
Its native commands run on-device. Features that use cloud providers, web search, licensing, or updates need a connection. Read more about what stays on your Mac with local AI.
Which Macs does Vehla support?
Vehla needs macOS 15.0 or later on an Apple Silicon Mac. It doesn't run on Intel Macs.
The Fastest Way to Snap Windows on Mac
To snap windows on a Mac, use edge dragging or Option-drag for speed, Fn-Control shortcuts for keyboard control, and the green button for multi-window layouts. Use Split View when you want two full-screen apps. macOS still leaves gaps, like no default corner shortcuts, and SnapWheel fills them in with a single gesture.
Ready to try it? Download Vehla for macOS and start on the free plan, or browse more Mac workflow tips in the Vehla field notes.